Hi guys, in this article we will see how to create a Subscribe Newsletter Design using HTML and CSS.
Have you ever wondered how people create such huge mailing lists to gain leads? The answer is very simple, it is because they have an attractive and well-designed subscribe newsletter design. People usually check their email. It has become one of the people’s traditions. Email has become as popular as cell phones. Also, email newsletters are sent fast and with minimum costs.
To create an effective newsletter, choose an email newsletter tool and figure out your newsletter’s goal. Then choose your subject line and sender name. Add alt text and a plain text version. Choose a template and gather your content.
Make sure you’re legally compliant. Personalize your template. Test different browsers and email providers. Set your email newsletter size. Add in your body content, analyze, and iterate. Add in personalization tokens and smart content. Finally, send your email.
The importance of gaining leads is never-ending. It helps in brand loyalty, improves ROI, boosts revenue, helps in sales, gives a competitive advantage, generates business opportunities, and much more. If you own a blogging website or a personal brand website, then having a newsletter is a must.
Table of Contents
Introduction
If you own a personal brand or blogging website, then having a subscribe newsletter is very important for the success of your brand, product, or article. It helps in sending promotional emails or marketing emails easily since you have access to user emails that are interested.
The pros of having a newsletter are a targeted audience, direct access to potential customers, building a subscriber list, building relationships, offering special access to newsletter subscribers, brand recognition, customer loyalty, and promoting new products.
The cons of having a newsletter are that they can end up in your lead’s spam folder, and system and human error can have a negative impact on your reputation. You need a lot of time, effort, and resources to create one.
Subscribe Newsletter is a way of collecting a user’s email addresses so that you can send them marketing messages and promotional offers via email. It is a simple UI component that contains a heading, description, input area for email, and a call-to-action button.
Watch the full tutorial on YouTube
Do you prefer watching a tutorial video over reading an article? No worries, you can watch a full tutorial on Subscribe Newsletter Design Using HTML and CSS on my YouTube channel. Later, you can visit again and access the full source code from here, if required. Do subscribe and like the content if you learn something new.
Source code for the Subscribe Newsletter Design using HTML and CSS
Creating the HTML Structure
Firstly, create a file named index.html with a default HTML5 boilerplate for the subscribe newsletter code.
Include the Font Awesome CDN inside the head section to use icons. Font Awesome is the best icon library and toolkit that is easy to use and used by millions of designers, developers, and content creators.
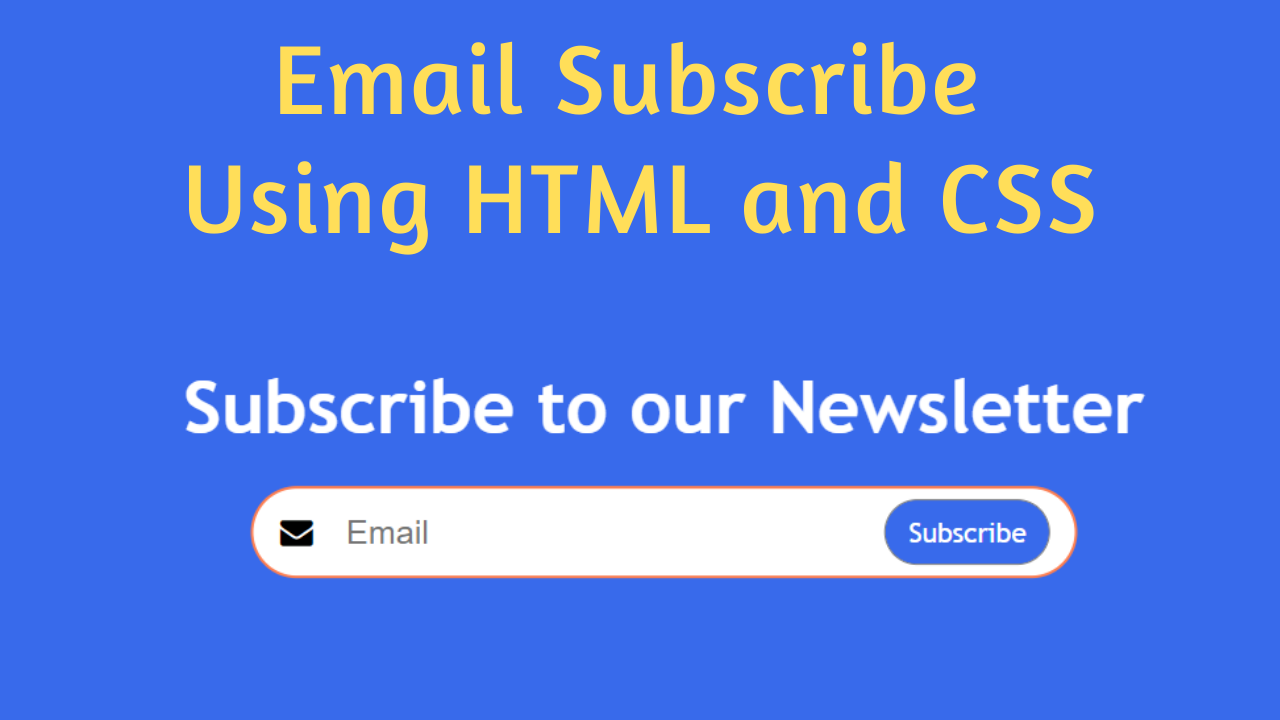
Now, inside the body section, create a div with the class name ‘container’. Create one h1 heading and a div with the class name ’email’ inside the container div.
Finally, inside the email div, create an email input field using the input tag with type as ’email’ and optionally placeholder as ‘Email’. Add an envelope icon from the font awesome library using the i tag, and create a button of type ‘submit’.
Paste the following code inside the index.html file:
<!DOCTYPE html>
<html lang="en">
<head>
    <meta charset="UTF-8">
    <meta http-equiv="X-UA-Compatible" content="IE=edge">
    <meta name="viewport" content="width=device-width, initial-scale=1.0">
    <link rel="stylesheet" href="style.css">
    <link rel="stylesheet" href="https://cdnjs.cloudflare.com/ajax/libs/font-awesome/4.7.0/css/font-awesome.min.css">
    <title>Email Subscription Form</title>
</head>
<body>

    <div class="container">
        <h1>Subscribe to our Newsletter</h1>
        <div class="email">
            <input type="email" placeholder="Email">
            <i class="icon fa fa-envelope"></i>
            <button type="submit">Subscribe</button>
        </div>
    </div>

</body>
</html>
Styling with CSS
Start with styling the body element to occupy the full height and width of the viewport and set the position as relative. Make the background #386aeb.
Now, the container div is styled with absolute position, centered on the screen, displayed as flex, flex-direction as a column, and centered align-items and justify-content. The h1 heading has a font size of 40px with a white color and an appropriate margin for extra spacing.
The email div has a height of 50px with relative positioning. I then styled the input tag with a width of 450px, a font size of 18px, no outline, a border with a solid thickness of 2px with a coral color, and a border radius of 50px.
Then, the class name ‘icon’ is styled with absolute positioning and a font size of 18px. Finally, the button has an absolute position with a cursor pointer, no outline, a border with a solid thickness of 1px with a gray color, and a border radius of 50px.
The button text is white, and the background is #286aeb. It has a hover animation with a transition of 0.3 seconds to change the button background to #1b3d94 when hovered.
Refer to the following code and paste it in style.css:
*{
    margin: 0;
    padding: 0;
    box-sizing: border-box;
    font-family: 'Trebuchet MS', 'Lucida Sans Unicode', 'Lucida Grande', 'Lucida Sans', Arial, sans-serif;
}

body{
    background: #386aeb;
    width: 100%;
    height: 100vh;
    position: relative;
}

.container{
    position: absolute;
    top: 50%;
    left: 50%;
    transform: translate(-50%, -50%);
    width: 100%;
    display: flex;
    flex-direction: column;
    align-items: center;
    justify-content: center;
}

.container h1{
    font-size: 40px;
    color: white;
    margin-bottom: 20px;
}

.container .email{
    height: 50px;
    position: relative;
}

.container .email input{
    height: 100%;
    width: 450px;
    padding-left: 50px;
    font-size: 18px;
    outline: none;
    font-family: Arial, Helvetica, sans-serif;
    border-radius: 50px;
    border: 2px solid coral;
}

.container .email .icon{
    position: absolute;
    left: 25px;
    top: 50%;
    transform: translate(-50%, -50%);
    font-size: 18px;
}

.container .email button{
    position: absolute;
    top: 50%;
    right: -30px;
    transform: translate(-50%, -50%);
    padding: 8px 12px;
    cursor: pointer;
    border-radius: 50px;
    border: 1px solid gray;
    outline: none;
    background: #286aeb;
    color: white;
    transition: 0.3s;
}

.container .email button:hover{
    background: #1b3d94;
}
Follow the above steps carefully, and you will be able to create a subscribe newsletter using HTML and CSS. You will get access to the full source code, which is shown in the video, by clicking on the button below.
Conclusion
In this article, we saw how to create a subscribe newsletter design using HTML and CSS. This will help you keep track of your mailing list. Now, I encourage you to build your own custom subscribe newsletter design using HTML and CSS and add additional features.
If you are still stuck somewhere or have any doubts regarding the same, feel free to leave your question in the comment section, and I will be happy to help as soon as possible.
Must Read: Responsive Services Section Using HTML & CSS
FAQ
How to make newsletter HTML CSS?
Create a container div with an h1 heading for the title, and then create another div that holds the email input and a subscribe button. Finally, apply appropriate styling to make it visually appealing.
How to add Subscribe button in HTML and CSS?
Create a button of type ‘submit’ and apply appropriate styling. Finally, add logic to the button using JavaScript to handle the onclick event.
How do I create an email bar in HTML?
To create an email bar in HTML, you need to use the input tag with the type ’email’ and optionally set the placeholder as ‘Email’. This is very helpful, as the input value is automatically validated to ensure it is in proper email format.