In this article, you will learn how to create a product card design using HTML, CSS, and jQuery with free access to full source code and a proper code explanation.
You must have seen that product cards are used on several popular e-commerce websites like Amazon and Flipkart. They use them effectively to showcase items in an organized manner, making it easy for customers to browse various product variations.
By following this article, you will be able to improve your site by incorporating multiple product cards, making it easier for users to read and understand.
Table of Contents
Introduction
To create an e-commerce website, designing an attractive and functional product card is an important step. They increase the user experience and potentially boost sales. For a good card design, think of a descriptive product name with multiple product images and informative product details with proper pricing. Do not forget to inform users about product availability and show relevant product parameters.
In this article, you will learn step-by-step how to design product cards using HTML and CSS and then add interactive features using jQuery to improve the user experience. You can further apply this knowledge to create different card designs, for example, with different pricing options or courses offered.
Watch the full tutorial on YouTube
If you prefer watching video tutorials over reading articles, you can watch a full tutorial on Product Card Design Using HTML, CSS, and jQuery on my YouTube channel. You can access the full source code here if needed. While you are at it, do subscribe and like the content.
Source code for the Product Card Design using HTML, CSS, and jQuery
Creating the HTML Structure
First, create one file named index.html with a default boilerplate for all the HTML code for the product card.
Now, inside the body section, create a div with the class name ‘product’ for storing product information. Make another div inside that div with the class name ‘product’ to hold the product’s image in a div with the class name ‘image’. The img tag has a class name of ‘product-image’.
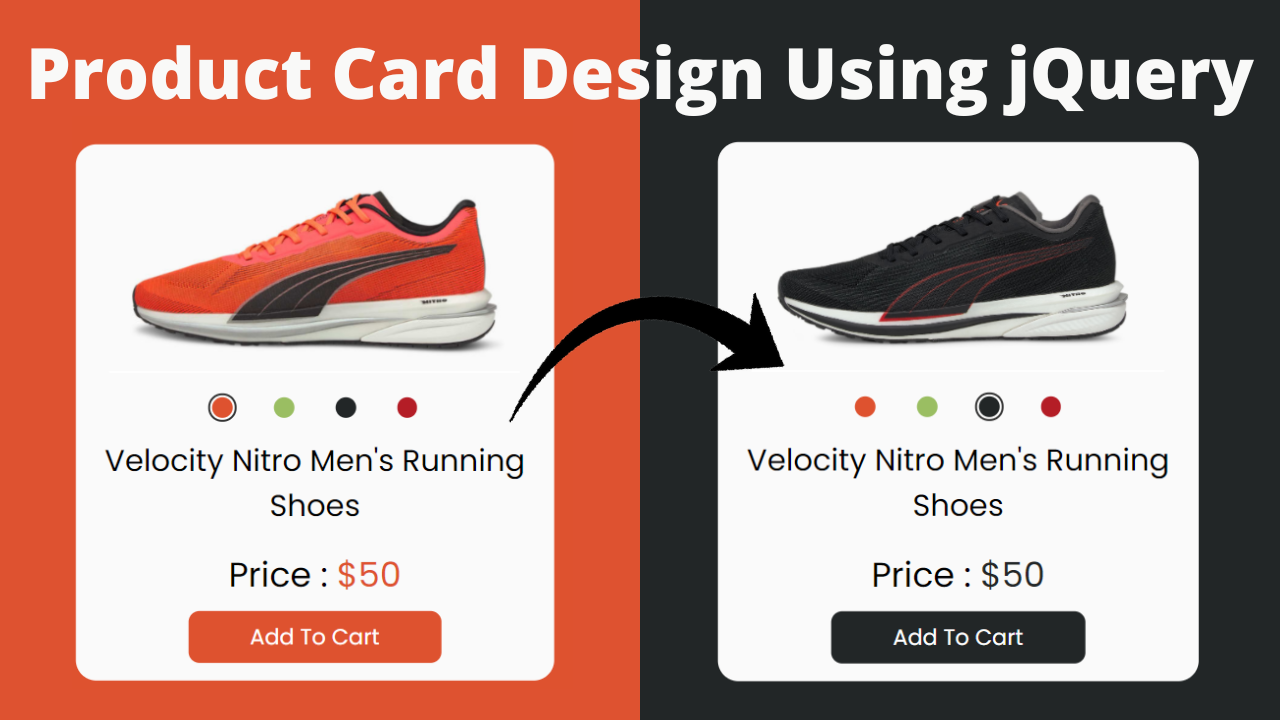
Inside the product div, another div with the class name ‘color’ is created, which stores different colors in separate span tags with a class name similar to that of color. The active class specifies which color is selected.
I created two more divs that are present inside the product div, one of which is used to store the title of the product with the class name ‘title’ and another to store the price of the product and the ‘Add To Cart’ button with the class name ‘detail’.
Lastly, include the jQuery CDN, and inside a script section, a function is created and called when the span inside the ‘color’ class is clicked. It removes the ‘active’ class from all color options and adds it to the selected color. It also changes the product image color, the button color, and the background.
<!DOCTYPE html>
<html lang="en">
<head>
    <meta charset="UTF-8">
    <meta http-equiv="X-UA-Compatible" content="IE=edge">
    <meta name="viewport" content="width=device-width, initial-scale=1.0">
    <link rel="stylesheet" href="style.css">
    <title>Product Card Design Using HTML and CSS - Coding Power</title>
</head>
<body>

   <div class="container">
       <div class="product">
           <div class="image">
               <img class="product-image" src="images/orange.png" alt="">
           </div>
           <div class="color">
               <span class="orange active" data-image="images/orange.png" data-color="#DE522F"></span>
               <span class="green" data-image="images/green.png" data-color="#9ABE62"></span>
               <span class="black" data-image="images/black.png" data-color="#222627"></span>
               <span class="red" data-image="images/red.png" data-color="#B41D26"></span>
           </div>
           <div class="title">
               Velocity Nitro Men's Running Shoes
           </div>
           <div class="detail">
               <p>Price : <span>$50</span></p>
               <a href="#">Add To Cart</a>
           </div>
       </div>
   </div>

   <script src="https://cdnjs.cloudflare.com/ajax/libs/jquery/3.6.0/jquery.min.js" integrity="sha512-894YE6QWD5I59HgZOGReFYm4dnWc1Qt5NtvYSaNcOP+u1T9qYdvdihz0PPSiiqn/+/3e7Jo4EaG7TubfWGUrMQ==" crossorigin="anonymous" referrerpolicy="no-referrer"></script>

   <script>
       $(".color span").click(function(){

        $(".color span").removeClass("active");
        $(this).addClass("active");
        $(".detail span").css("color",$(this).attr("data-color"));
        $(".detail a").css("background",$(this).attr("data-color"));
        $(".product-image").attr("src",$(this).attr("data-image"));
        $("body").css("background",$(this).attr("data-color"));
       });
   </script>

</body>
</html>
<span style="font-family: arial;"></span>
Styling with CSS
For styling, create a new file named style.css and add a style link to the HTML head to link to the CSS file. If you miss that, then CSS will not work for any HTML class or element, so make sure of that first.
Once this is done, we will start with styling for the product card, so first we will use the @import rule to import the Google Fonts library for the ‘Poppins’ font with different weights.
After that, the body element is styled to occupy the full width and height of the viewport in a relative position with the background color #DE522F.
Then the class ‘container’ is centered on the screen with an absolute position, width of 350px, and height of 400px, and transform as translate of -50%.
The background of class ‘product’ is set to #fafafa, with a border radius of 15px, text alignment set to center, and padding set to 20px on all sides.
Then, for class ‘image’, I set the width as 300px, the height as 150px, and it is in the center with the margin set as auto. The color selection section has a flex display that is centered. Each color option has a border radius and a cursor pointer.
Also, the class ‘title’ has a font size of 22px, centered, and the class ‘detail’ has a font size of 25px, some margin, and a color of #DE522F.
In the end, the tag inside class ‘detail’ has text decoration as none, background color of #DE522F, color as white, border-radius of 8px, and I have given some margin for spacing.
@import url('https://fonts.googleapis.com/css2?family=Poppins:wght@300;400;500;600&display=swap');

*{
    margin: 0;
    padding: 0;
    box-sizing: border-box;
    font-family: 'Poppins', sans-serif;
}

body{
    width: 100%;
    height: 100vh;
    position: relative;
    background: #DE522F;
}

.container{
    width: 350px;
    height: 400px;
    position: absolute;
    left: 50%;
    top: 50%;
    transform: translate(-50%,-50%);
}

.container .product{
    background: #fafafa;
    padding: 20px;
    text-align: center;
    border-radius: 15px;
}

.container .product .image{
    width: 300px;
    height: 150px;
    margin: auto;
}

.container .product .image .product-image{
    width: 100%;
    height: 100%;
    object-fit: contain;
    transition: 0.8s linear;
}

.container .product .color{
    display: flex;
    align-items:center ;
    justify-content: center;
    margin: 15px;
}

.container .product .color span{
    width: 15px;
    height: 15px;
    margin: 0 15px;
    border-radius: 50%;
    background: #DE522F;
    cursor: pointer;
    position: relative;
}

.container .product .color .green{
    background: #9ABE62;
}

.container .product .color .black{
    background: #222627;
}

.container .product .color .red{
    background: #B41D26;
}

.container .product .color .orange{
    background: #DE522F;
}

.container .product .color .active::after{
    content: "";
    width: 17px;
    height: 17px;
    border-radius: 50%;
    border: 2px solid #333;
    position: absolute;
    left: -3px;
    top: -3px;
}

.container .product .title{
    font-size: 22px;
    text-align: center;
}

.container .product .detail{
    text-align: center;
}

.container .product .detail p{
    margin: 15px;
    font-size: 25px;
}

.container .product .detail p span{
    color: #DE522F;
}

.container .product .detail a{
    text-decoration: none;
    background: #DE522F;
    padding: 8px 45px;
    border-radius: 8px;
    color: white;
    margin: 15px;
}
That’s all you have to do to create the product card design using HTML, CSS, and jQuery. You can access the full source code with images, which is shown in the video tutorial, by clicking the below button.
Conclusion
In this article, we have learned about product card design using HTML, CSS, and jQuery. If you are still stuck somewhere or have any doubts regarding the same, feel free to leave your question in the comment section. I will be happy to help.
See Also: Responsive Card Slider using HTML, CSS, and JavaScript
FAQ
What is a product card in HTML?
A product card is a UI component used in websites to display information about a product, including its name, image, price, and other relevant details.
How to design a product card in HTML CSS?
Think of a descriptive product name with multiple product images and informative product details with proper pricing. Inform users about product availability and show relevant product parameters.
Should I include customer reviews on the product card?
Yes, you should include customer reviews on the product card, as it helps build trust and provides valuable insights. You can use a star rating for overall review sentiment.
How do I create multiple product cards in HTML?
Create a new product div inside the container div with appropriate product names, images, and informative product details with proper pricing.
Why use card design?
We use card design as it provides clear and concise information about the product with captivating visuals, which in turn enhances the user experience.