Do you want to increase your reputation in the market? Then, learn how to create a responsive testimonial design using HTML and CSS to incorporate into your website, whether it be a portfolio or agency.
Testimonials are formal written descriptions or statements about a person’s abilities, character, and qualities, often given by a previous employer. On a website, they can emphasize the positive responses, reviews, or feedback provided by satisfied users or clients.
Table of Contents
Introduction
You may wonder why testimonial design is so important. It guarantees instant awareness to visitors and features them clearly in a testimonial area on the website’s homepage or a dedicated landing page. Make a page just for testimonials, particularly if you have a large number of them to share.
In this article, you will learn how to create a responsive testimonial design using HTML and CSS by following a few easy-to-understand steps. To learn more about responsive designs that can help your agency or enhance your portfolio, check out the Responsive Services Section Using HTML & CSS.
Watch the full tutorial on YouTube
If you prefer watching video tutorials over reading articles, you can watch a full tutorial on Responsive Testimonial Design Using HTML and CSS on my YouTube channel. If needed, you can access the full source code here. While you are at it, do subscribe and like the content.
Source code for the Responsive Testimonial Design Using HTML and CSS
Creating the HTML Structure
First, create a file named index.html with the default boilerplate code for the HTML code of responsive testimonial design.
Include the Font Awesome CDN inside the head section for icons. Font Awesome is the best icon library and toolkit, easy to use and used by millions of designers, developers, and content creators.
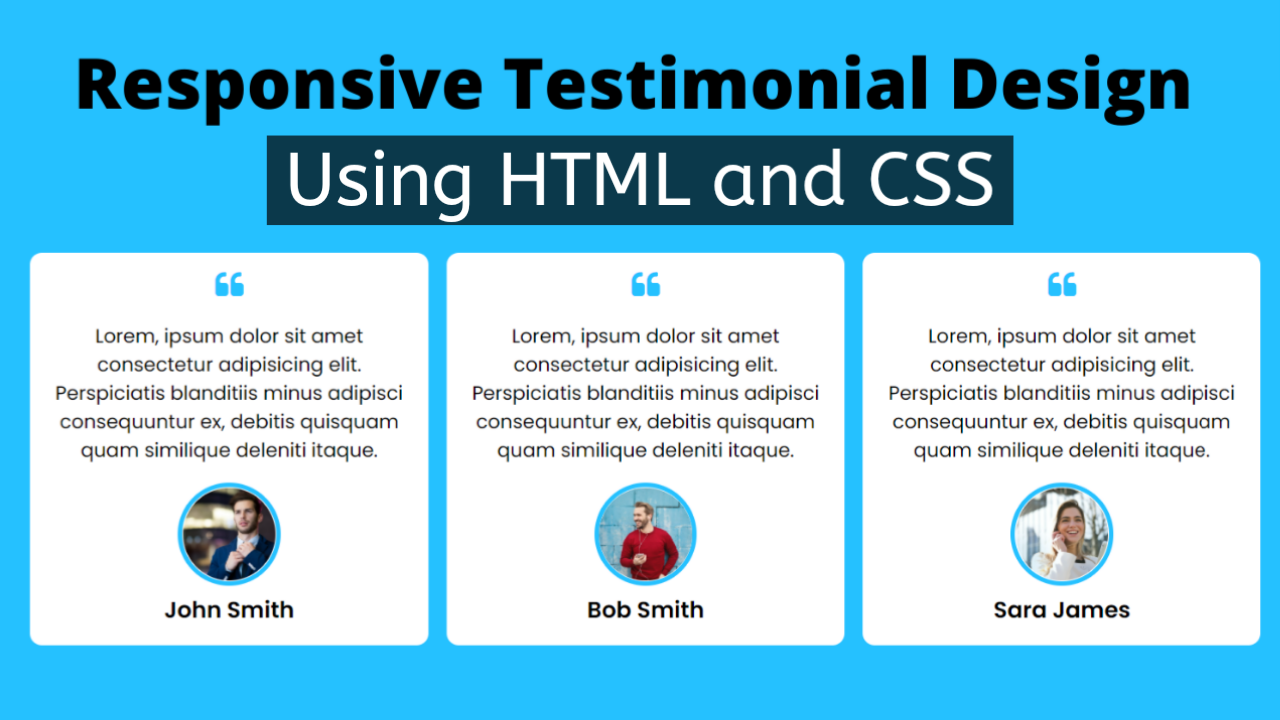
Create multiple divs with the class name ‘card’ inside the div with the class name ‘container’ for storing the details of different testimonials.
The card div holds details such as the i tag for the font awesome quote-left icon, a paragraph tag for the testimonial description, an image tag for the profile of testimony, and a heading tag for the name of testimony.
Refer to the following HTML code and paste it into a file named index.html:
<!DOCTYPE html>
<html lang="en">
<head>
    <meta charset="UTF-8">
    <meta http-equiv="X-UA-Compatible" content="IE=edge">
    <meta name="viewport" content="width=device-width, initial-scale=1.0">
    <link rel="stylesheet" href="style.css">
    <!-- Font Awesome Link -->
    <link rel="stylesheet" href="https://cdnjs.cloudflare.com/ajax/libs/font-awesome/4.7.0/css/font-awesome.min.css">
    <title>Responsive Testimonial Design - Coding Power</title>
</head>
<body>

    <div class="container">
        <div class="card">
            <i class="fa fa-quote-left"></i>
            <p>Lorem ipsum dolor sit amet consectetur adipisicing elit. Distinctio harum nostrum, quod facere sit deleniti quia obcaecati quam ab saepe?</p>
            <img src="images/testimonial-1.jpg" alt="">
            <h3>John Smith</h3>
        </div>
        <div class="card">
            <i class="fa fa-quote-left"></i>
            <p>Lorem ipsum dolor sit amet consectetur adipisicing elit. Distinctio harum nostrum, quod facere sit deleniti quia obcaecati quam ab saepe?</p>
            <img src="images/testimonial-2.jpg" alt="">
            <h3>Bob Smith</h3>
        </div>
        <div class="card">
            <i class="fa fa-quote-left"></i>
            <p>Lorem ipsum dolor sit amet consectetur adipisicing elit. Distinctio harum nostrum, quod facere sit deleniti quia obcaecati quam ab saepe?</p>
            <img src="images/testimonial-3.jpg" alt="">
            <h3>Sara James</h3>
        </div>
    </div>

</body>
</html>
Styling with CSS
For styling, create a new file named style.css and add a style link to the HTML head to link to the CSS file. If you miss that, then CSS will not work for any HTML class or element, so make sure of that first.
Firstly, use the @import rule to import the Google Fonts library for the ‘Poppins’ font with different weights.
Style the body element to take up the full height of the viewport with a flex display, centered align-items, centered justify-content, and background of #25c1ff.
Now, style the container div to have a flex display, flex-wrap as a wrap, centered align-items, and justify the content spaced evenly. Then, style the card div to have center text alignment, white background, border radius of 10 pixels, and appropriate margin and padding.
Next, style the i tag to have a font size of 25 pixels and a color of #25c1ff, the p tag to have an appropriate margin, and the img tag to have a border radius of 50% with a 4-pixel solid border of color #25c1ff and object-fit as cover.
Copy and paste the following CSS code in the file named style.css:
@import url('https://fonts.googleapis.com/css2?family=Poppins:wght@300;400;500;600&display=swap');

*{
    margin: 0;
    padding: 0;
    box-sizing: border-box;
    font-family: 'Poppins', sans-serif;
}

body{
    height: 100vh;
    display: flex;
    align-items: center;
    justify-content: center;
    background: #25c1ff;
}

.container{
    display: flex;
    flex-wrap: wrap;
    align-items: center;
    justify-content: space-evenly;
}

.container .card{
    width: 330px;
    padding: 15px;
    background: white;
    text-align: center;
    margin: 0 15px 15px 0;
    border-radius: 10px;
}

.container .card i{
    font-size: 25px;
    color: #25c1ff;
}

.container .card p{
    margin: 15px 0;
}

.container .card img{
    width: 85px;
    height: 85px;
    border-radius: 50%;
    object-fit: cover;
    border: 4px solid #25c1ff;
}

@media (max-width:660px){
    .container .card{
        margin: 0 0 15px 0;
    }
}
That’s all you need to do to create a responsive testimonial design using HTML and CSS. You can access the full source code in the video tutorial by clicking the button below.
Conclusion
This article taught us about responsive testimonial design using HTML and CSS. If you are still stuck or have any doubts, feel free to leave your question in the comment section. I will be happy to help.
After this, you can create amazing and good-looking testimonial sections. You can even incorporate this into your website, encouraging and convincing potential clients or customers to act.
See Also: Best Filterable Image Gallery using HTML, CSS, and jQuery
FAQ
How do you feature testimonials?
To guarantee instant awareness to visitors, feature them clearly in a testimonial area on the website’s homepage or a dedicated landing page.
Make a page just for testimonials, particularly if you have a large number of them to share.
What is testimonial in CSS?
On a website, they can emphasize the positive responses, reviews, or feedback provided by satisfied users or clients.
They can encourage and convince potential clients or customers to act.
How do you add a testimonial slider in HTML?
First, using HTML, create the basic structure for the testimonials with some necessary attributes and elements. Then, use CSS to style the testimonials section appropriately.
Finally, JavaScript is used to add the logic and make the slider for testimonials with a responsive design.