Do you want to create an exact replica of Google’s Google Home page? In this article, I will teach you how to create the perfect Google Home page using HTML and CSS.
To build a good home page, you should keep your layout clean and easy to navigate for users. The call-to-action buttons should be optimized and the content should be updated regularly. You should also make sure that the color scheme and background goes well together.
Table of Contents
Introduction
Cloning or replicating a website or home page not only enhances your skills but also it allows you to develop sites quickly. It is inexpensive and doesn’t require any deep knowledge. Moreover, having a good home page increases user experience and user retention.
Now, let us start creating an awesome and good-looking replica of Google’s home page using HTML and CSS so that you can showcase your web development skills.
Watch the full tutorial on YouTube
Sometimes, watching a video tutorial rather than reading an article can help you understand the concept easily. If you prefer that, I have created a video on the Google Home Page Using HTML and CSS on my YouTube channel. You can access the complete source code here if needed. While you are at it, do subscribe and like the content.
Source code for the Google Home Page Using HTML and CSS
Creating the HTML Structure
The first step is to create a file named index.html with the default HTML code for the responsive team section. In the head section, include the Font Awesome CDN. Font Awesome is a font and icon toolkit based on CSS.
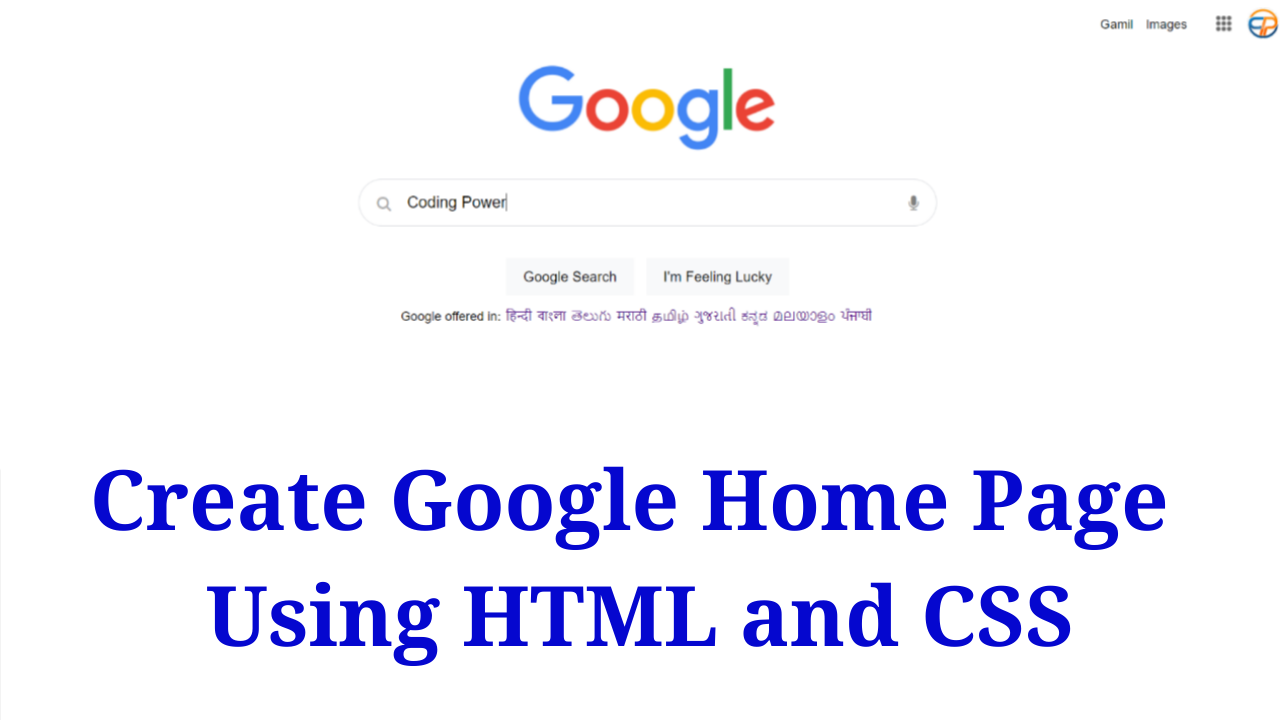
Create a nav element with the class name ‘navbar’ that contains an unordered list of services like Gmail, Images, etc., and a div with the class name ‘images’ for the more services dots logo and the profile logo.
Then, create a div with the class name ‘google’ which contains an img element for the google logo. Now, create a div with the class name ‘search’ that contains a div with the class name ‘input’.
The input div contains an <i> element for the search icon, a text input, an <i> element for the microphone icon, and a div with the class name ‘buttons’ for “Google Search” and “I’m feeling lucky” options.
Finally, create a div with the class name ‘languages’ which contains an unordered list for the different languages.
Copy and paste the following HTML code into the file named index.html:
<!DOCTYPE html>
<html lang="en">

<head>
    <meta charset="UTF-8">
    <meta http-equiv="X-UA-Compatible" content="IE=edge">
    <meta name="viewport" content="width=device-width, initial-scale=1.0">
    <link rel="stylesheet" href="style.css">
    <link rel="icon" type="image/favicon" href="images/favicon.ico">
    <link rel="stylesheet" href="https://cdnjs.cloudflare.com/ajax/libs/font-awesome/4.7.0/css/font-awesome.min.css">
    <title>Google</title>
</head>
<body>

    <nav class="navbar">
        <ul>
            <li><a href="#">Gamil</a></li>
            <li><a href="#">Images</a></li>
        </ul>
        <div class="images">
            <a href="#"><img src="images/dots.png" alt=""></a>
            <a href="#"><img src="images/account-logo.jpg" alt=""></a>
        </div>
    </nav>
    <div class="google">
        <img src="images/google.png" alt="">
    </div>
    <div class="search">
        <div class="input">
            <i class="fa fa-search"></i>
            <input type="text">
            <i class="fa fa-microphone"></i>
            <div class="buttons">
                <button><a href="#">Google Search</a></button>
                <button><a href="#">I'm Feeling Lucky</a></button>
            </div>
        </div>
    </div>
    <div class="languages">
        <p>Google offered in:</p>
        <ul>
            <li><a href="#">हिन्दी</a></li>
            <li><a href="#">বাংলা</a></li>
            <li><a href="#">తెలుగు</a></li>
            <li><a href="#">मराठी</a></li>
            <li><a href="#">தமிழ்</a></li>
            <li><a href="#">ગુજરાતી</a></li>
            <li><a href="#">ಕನ್ನಡ</a></li>
            <li><a href="#">മലയാളം</a></li>
            <li><a href="#">ਪੰਜਾਬੀ</a></li>
        </ul>
    </div>

</body>
</html>
Styling with CSS
For styling, create a new file named style.css and add a style link to the HTML head to link to the CSS file. If you miss that, then styles will not work for any HTML class or element.
Style the body element to take up the full width of the viewport. The navbar is styled to have a relative positioning with a float of right and a white color. Also, the unordered list of navbar is styled to have a flex display with an absolute positioning.
Now, the images div is styled to have a flex display with an absolute positioning and a float of right. Then, the google div is styled to have a width of 100% and the img element is styled to have a block display with a line height of 91 pixels.
I then style the search div to have a block display and the input div is styled to have a relative positioning. The text input is styled to have a block display with a border radius of 24 pixels, a font size of 15 pixels, no outline. and a solid border of #dfe1e5.
The search icon and microphone icon are styled to have an absolute positioning with a font size of 15 pixels and a pointer cursor. Now, the buttons div is styled to have a block display with centered text alignment.
Finally, the languages div is styled to have a flex display with a font size of 12 pixels and a line height of 12 pixels. Also, the unordered list of languages is styled to have a flex display.
Refer to the following CSS code and paste it into the file named style.css:
*{
    margin: 0;
    padding: 0;
    box-sizing: border-box;
    font-family: arial,sans-serif;
}

body{
    width: 100%;
}

.navbar{
    width: 100%;
    height: 60px;
    padding: 5px;
    color: white;
    float: right;
    position: relative;
}

.navbar ul{
    display: flex;
    position: absolute;
    right: 100px;
    line-height: 30px;
}

.navbar ul li{
    list-style: none;
    margin: auto 0;
    margin-right: 12px;
}

.navbar ul li a{
    text-decoration: none;
    color: black;
    font-size: 12px;
}

.navbar ul li a:hover{
    text-decoration: underline;
}

.navbar .images{
    display: flex;
    height: 30px;
    float: right;
    position: absolute;
    right: 10px;
}

.navbar .images a{
    margin-right: 15px;
    align-items: center;
    justify-content: center;
    display: flex;
}

.navbar .images a img{
    display: block;
    height: 30px;
    margin: auto 0;
    line-height: 60px;
}

.navbar .images a:nth-child(1) img{
    height: 15px;
    opacity: 0.6;
}

.google{
    margin-top: 5px;
    width: 100%;
}

.google img{
    height: 83px;
    line-height: 91px;
    display: block;
    margin: 0 auto;
}

.search{
    width: 550px;
    height: 45px;
    display: block;
    margin: 0 auto;
    margin-top: 25px;
}

.search .input{
    height: 45px;
    position: relative;
}

.search .input input{
    width: 100%;
    display: block;
    margin: 0 auto;
    height: 45px;
    border-radius: 24px;
    outline: none;
    border: 1px solid #dfe1e5;
    padding: 0 45px;
    font-size: 15px;
}

.search .input input:hover{
    box-shadow: 2px 1px 2px rgba(0, 0, 0, 0.3);
}

.search .input .fa-search{
    font-size: 15px;
    position: absolute;
    left: 17px;
    top: 16px;
    color: rgba(0, 0, 0, 0.3);
    cursor: pointer;
}

.search .input .fa-microphone{
    font-size: 15px;
    position: absolute;
    right: 17px;
    top: 16px;
    color: rgba(0, 0, 0, 0.5);
    cursor: pointer;
}

.buttons{
    display: block;
    text-align: center;
    margin-top: 20px;
}

.buttons button{
    min-width: 54px;
    height: 35px;
    padding: 0 16px;
    margin: 11px 4px;
    border: none;
    background: #f8f9fa;
}

.buttons button:hover{
    color: #202124;
    border: 1px solid #dadce0;
    border-radius: 4px;
    box-shadow: 0 1px 1px rgba(0, 0, 0, /10%);
}

.buttons button a{
    text-decoration: none;
    color: black;
}

.languages{
    width: 470px;
    margin: 0 auto;
    margin-top: 80px;
    display: flex;
    font-size: 12px;
    line-height: 12px;
}

.languages ul{
    display: flex;
    margin-left: 5px;
}

.languages ul li{
    list-style: none;
    margin-right: 5px;
}

.languages ul li a{
    text-decoration: none;
}

.languages ul li a:hover{
    text-decoration: underline;
}
That’s all you need to do to create an excellent google home page using HTML and CSS. The video tutorial’s complete source code can be accessed by clicking the button below.
Conclusion
In this article, we saw how to create a fantastic Google home page using HTML and CSS. You can incorporate this into your websites and I encourage you to build your custom home page with additional features.
If you are still stuck somewhere or have any doubts regarding the same, feel free to leave your question in the comment section, and I will be happy to help as soon as possible.
Must Visit: Responsive Image Gallery Using HTML and CSS
FAQ
How to create a Google homepage using HTML and CSS?
To create a google home page using HTML and CSS, create a nav element, a div which contains an img element for the google logo, a div that contains a text input, and a div for different languages.