Do you want to create a pricing section on your agency website? In this article, we will create a perfect pricing card design using HTML and CSS. Pricing cards are graphical elements on a webpage that display different pricing plans or packages for a product or service.
They generally include each plan’s title, description, features, and price. Pricing cards can also include calls to action, such as “Buy Now”, to encourage users to take action.
Table of Contents
Introduction
To create a good price table, the differences between each tier should be noticeable. Add hover details for the key features and ensure the call to action stands out.
We will learn how to create the perfect pricing card design using HTML and CSS. You can also make a Responsive Services Section Using HTML & CSS while incorporating this pricing card design.
Watch the full tutorial on YouTube
Sometimes, watching a video tutorial rather than reading an article can help you understand the concept more easily. If you prefer that, I have created a video on the Pricing Card Design Using HTML and CSS on my YouTube channel. You can access the complete source code here if needed. While you are at it, do subscribe and like the content.
Source code for the Pricing Card Design Using HTML and CSS
Creating the HTML Structure
Create a file named index.html with the default HTML boilerplate code for the pricing card design. Include the Font Awesome CDN inside the head section for icons. Font Awesome is the best icon library and toolkit; it is easy to use and used by millions.
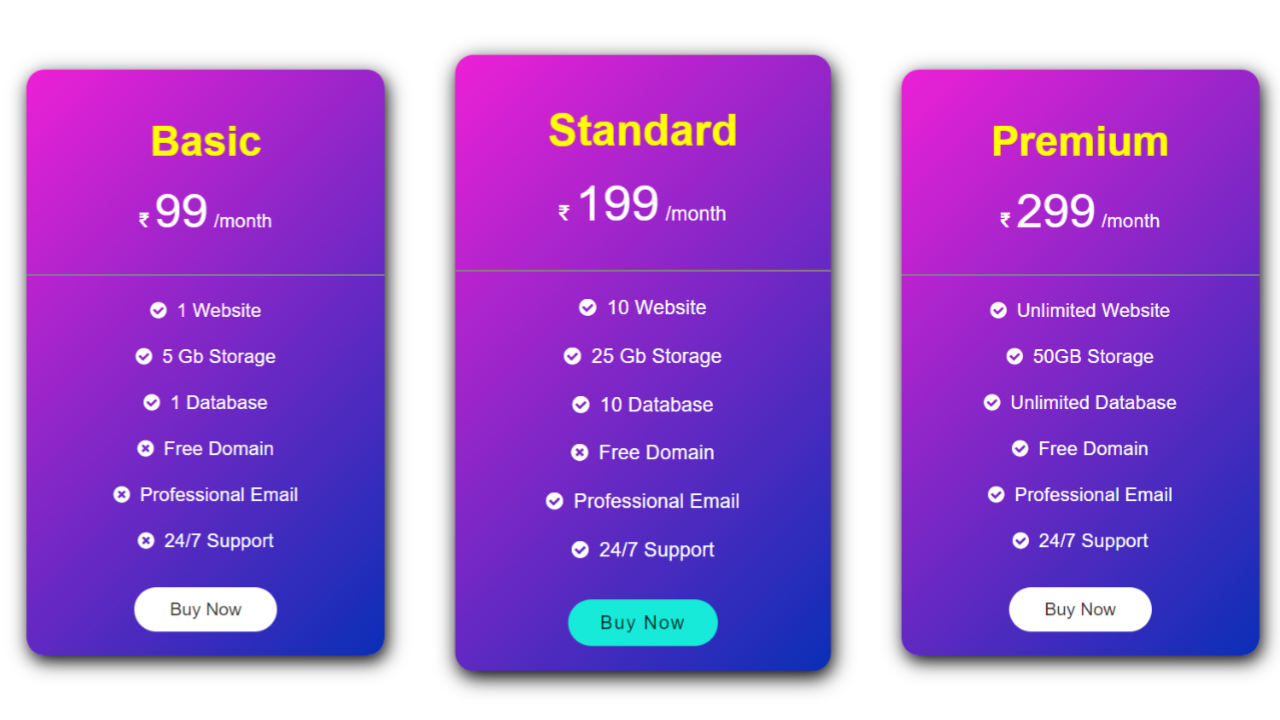
Create a div with the class name ‘container’ that contains multiple divs with the class name ‘card’. The card div contains a div with the class name ‘card-title’ and another with the class name ‘card-content’.
Now, the card-title div contains a heading and a paragraph for the price. Finally, the card-content div includes an unordered list of the card content and a button.
Refer to the following HTML code and paste it into the file named index.html:
<!DOCTYPE html>
<html lang="en">
<head>
    <meta charset="UTF-8">
    <meta http-equiv="X-UA-Compatible" content="IE=edge">
    <meta name="viewport" content="width=device-width, initial-scale=1.0">
    <link rel="stylesheet" href="style.css">
    <link rel="stylesheet" href="https://cdnjs.cloudflare.com/ajax/libs/font-awesome/4.7.0/css/font-awesome.min.css">
    <title>Pricing - Coding Power</title>
</head>
<body>

   <div class="container">
       <div class="card">
           <div class="card-title">
               <h2>Basic</h2>
               <p><i class="fa fa-rupee"></i><Span>99</Span>/month</p>
           </div>
           <div class="card-content">
               <ul>
                   <li><i class="fa fa-check-circle"></i>1 Website</li>
                   <li><i class="fa fa-check-circle"></i>5 Gb Storage</li>
                   <li><i class="fa fa-check-circle"></i>1 Database</li>
                   <li><i class="fa fa-times-circle"></i>Free Domain</li>
                   <li><i class="fa fa-times-circle"></i>Professional Email</li>
                   <li><i class="fa fa-times-circle"></i>24/7 Support</li>
               </ul>
               <button><a href="#">Buy Now</a></button>
           </div>
       </div>
       <div class="card">
           <div class="card-title">
               <h2>Standard</h2>
               <p><i class="fa fa-rupee"></i><Span>199</Span>/month</p>
           </div>
           <div class="card-content">
               <ul>
                   <li><i class="fa fa-check-circle"></i>10 Website</li>
                   <li><i class="fa fa-check-circle"></i>25 Gb Storage</li>
                   <li><i class="fa fa-check-circle"></i>10 Database</li>
                   <li><i class="fa fa-times-circle"></i>Free Domain</li>
                   <li><i class="fa fa-check-circle"></i>Professional Email</li>
                   <li><i class="fa fa-check-circle"></i>24/7 Support</li>
               </ul>
               <button><a href="#">Buy Now</a></button>
           </div>
       </div>
       <div class="card">
           <div class="card-title">
               <h2>Premium</h2>
               <p><i class="fa fa-rupee"></i><Span>299</Span>/month</p>
           </div>
           <div class="card-content">
               <ul>
                   <li><i class="fa fa-check-circle"></i>Unlimited Website</li>
                   <li><i class="fa fa-check-circle"></i>5 Gb Storage</li>
                   <li><i class="fa fa-check-circle"></i>Unlimited Database</li>
                   <li><i class="fa fa-check-circle"></i>Free Domain</li>
                   <li><i class="fa fa-check-circle"></i>Professional Email</li>
                   <li><i class="fa fa-check-circle"></i>24/7 Support</li>
               </ul>
               <button><a href="#">Buy Now</a></button>
           </div>
       </div>
   </div>

</body>
</html>
Styling with CSS
Create a CSS file named style.css and link it to the HTML file. Do not forget this step; otherwise, the CSS styles won’t be applied.
Style the body div to take up the entire width and height of the viewport. Now, the container div is styled to have a flex display with centered align-items, justify-content as space-around, and a white text color.
The card div is styled to have a center text alignment with a linear gradient background, a border radius of 15 pixels, a box shadow, and a transition of transform and 0.3 seconds to scale the card by a factor of 1.050 on hover.
Then, the button element is styled to have no outline or border with a border radius of 20 pixels, a margin-bottom of 10 pixels, a pointer cursor, a white background, and a transition of 0.3 seconds to change the background of the button to #17ead9 on hover.
Refer to the following CSS code and paste it into the file named style.css:
*{
    margin: 0;
    padding: 0;
    box-sizing: border-box;
    font-family: Arial, Helvetica, sans-serif;
}

body{
    width: 100%;
    height: 100vh;
}

.container{
    width: 1100px;
    height: 100%;
    margin: auto;
    display: flex;
    align-items: center;
    justify-content: space-around;
    color: white;
}

.container .card{
    width: 300px;
    height: auto;
    padding: 10px 0;
    text-align: center;
    background: linear-gradient(135deg, #ee20d6 0%, #0a2fb6 100%);
    border-radius: 15px;
    box-shadow: 2px 5px 15px black;
    transition: transform 0.3s;
}

.container .card:hover{
    transform: scale(1.050);
}

.container .card .card-title{
    padding: 30px 20px;
    border-bottom: 2px solid gray;
}

.container .card .card-title h2{
    font-size: 35px;
    padding-bottom: 15px;
    color: yellow;
}

.container .card .card-title p span{
    font-size: 40px;
    padding: 0 5px;
}

.container .card .card-content ul{
    padding: 10px 30px;
    padding-bottom: 20px;
}

.container .card .card-content ul li{
    list-style: none;
    padding: 10px 0;
}

.container .card .card-content ul li i{
    margin-right: 4px;
}

.container .card .card-content button{
    width: 120px;
    padding: 10px 20px;
    background: white;
    border-radius: 20px;
    margin-bottom: 10px;
    outline: none;
    border: none;
    cursor: pointer;
    transition: 0.3s;
}

.container .card .card-content button:hover{
    background: #17ead9;
    letter-spacing: 1.2px;
}

.container .card .card-content button a{
    text-decoration: none;
    color: black;
    font-size: 15px;
}
By following the above steps carefully, you can create a pricing card design using HTML and CSS. The complete source code, shown in the video, can be accessed by clicking on the button below.
Conclusion
In this article, we saw how to create a fantastic pricing card design using HTML and CSS. You can incorporate this into your agency website designs. I encourage you to build your custom pricing card design using HTML and CSS.
If you are still stuck somewhere or have any doubts regarding the same, feel free to leave your question in the comment section, and I will be happy to help as soon as possible.
Do Visit: Amazing Scroll To Top Button with HTML, CSS & JavaScript
FAQ
How to create a price table?
To create a good price table, the differences between each tier should be obvious. Add hover details for the key features and ensure the call to action stands out.
How to make a price list in HTML and CSS?
Create a div with the class name ‘container’ that contains multiple divs with the class name ‘card’. The card div contains a div with the class name ‘card-title’ and another with the class name ‘card-content’.
Hi, can I make this responsive?
Yes, you can